AJS Furniture
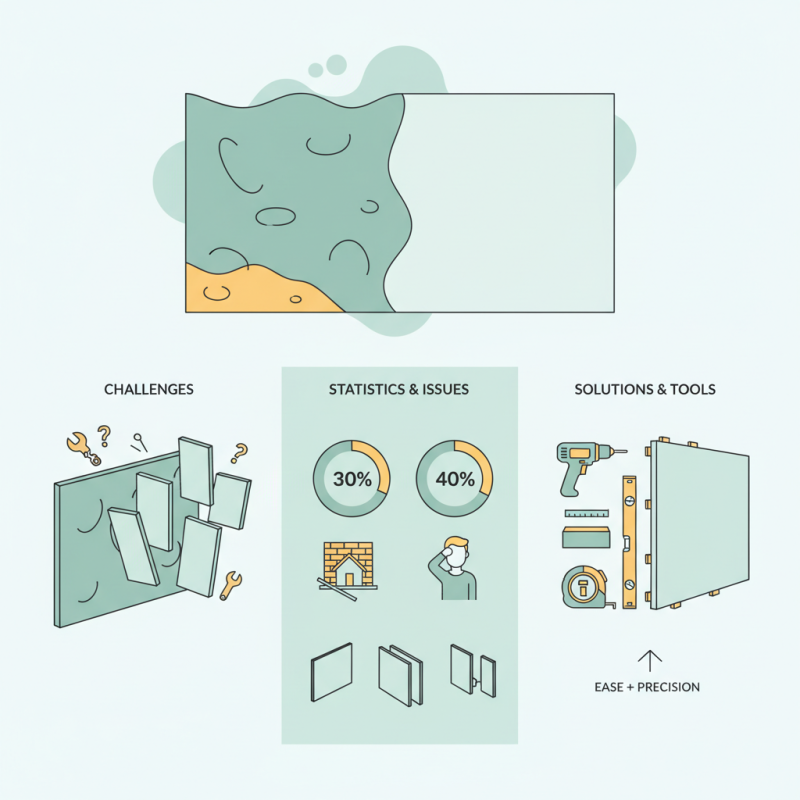
Installing wall panels on uneven surfaces presents unique challenges. According to recent industry reports, about 30% of residential walls are not perfectly flat. This can lead to complications during installation, affecting both aesthetics and functionality. It's crucial to understand how to install wall panels over uneven surfaces effectively. Utilizing advanced techniques can simplify this process significantly.
Many DIY enthusiasts and professionals report common frustrations in ensuring a seamless fit on irregular walls. Without proper methods, panels may warp, buckle, or create gaps. Industry surveys indicate that 40% of homeowners seek solutions for wall surface irregularities before starting their projects. Recognizing these hurdles is essential. It pushes for innovative approaches that align with best practices.
Equipping yourself with the right knowledge and tools can make a difference. With proper preparation, skilled individuals can achieve a polished look. While it’s possible to learn through trial and error, reflecting on mistakes can provide valuable insights. This guide aims to share experiences that will enhance your confidence and reliability in wall panel installation.
Uneven surfaces can pose significant challenges during wall panel installation. Many homes feature walls that are not perfectly straight. This may lead to gaps, warping, and other installation problems. Identifying the irregularities in your wall is crucial. Use a straightedge or level to assess the area before applying any panels.
A common mistake is overlooking minor imperfections. Even slight bumps or dips can affect how panels align. Properly measuring these areas can save time and reduce frustration. Consider using shims or additional framing to help create a stable foundation for the panels. This approach may require extra effort, but it can ultimately lead to a more precise fit.
Surface preparation is equally important. Cleaning the wall thoroughly helps ensure good adhesion. Apply adhesive uniformly, paying attention to low spots. Remember, achieving a seamless finish may not happen on the first try. Be prepared for adjustments and corrections along the way. Embracing this learning process can lead to a rewarding installation experience.
When installing wall panels on uneven surfaces, choosing the right tools is crucial. Measuring tools are essential for precise alignment. A laser level ensures accuracy. Studies show that using a laser level can decrease installation time by approximately 30%. Other necessary tools include a stud finder, utility knife, and a power drill. These items help to create a solid foundation for your panels.
In addition to tools, selecting the right materials is vital. Opt for adjustable panel clips and furring strips. These materials can help bridge gaps caused by uneven surfaces. According to industry data, using furring strips can improve panel stability by 40%. Consider soundproofing materials too, especially for walls that separate living spaces. However, be aware that not all materials work well together. It's important to do trials on small patches to see how they interact before full application.
Installation can be tricky. Even skilled hands face challenges. Uneven surfaces can cause misalignment, leading to wasted materials. A recent survey indicated that 25% of DIY projects failed due to improper planning and execution. A reflective approach can lead to better results. Preparing adequately and knowing potential pitfalls makes the installation smoother. The right preparation can save time and costs in the long run.
| Tools | Materials | Preparation Steps |
|---|---|---|
| Measuring Tape | Wall Panels | Inspect wall for unevenness |
| Level Tool | Adhesive or Panel Fasteners | Remove any old wall coverings |
| Utility Knife | Underlayment (for best results) | Clean the wall surface |
| Screwdriver or Drill | Sealing Caulk | Measure and cut panels to fit |
| Safety Goggles | Finish Trim (if needed) | Dry fit panels for adjustments |
Preparing walls for panel installation on uneven surfaces can be challenging. A thorough assessment is crucial. Inspect for significant bumps and depressions. According to industry studies, up to 30% of wall surfaces may have irregularities. This can lead to improper panel alignment, resulting in gaps. It’s important to identify any areas that need leveling before proceeding.
To begin, clean the wall’s surface. Remove dust, grease, and old paint. A clean surface ensures better adhesion. For noticeable unevenness, consider using a leveling compound. Application can vary based on the wall's condition. Professionals recommend a drying period of 24 hours for these compounds. This allows for a stable base. If uneven spots remain, a second layer may be necessary.
After preparing the wall, measure precisely where panels will go. Mark these spots carefully. Accurate measurements account for possible misalignments. According to a report from the Building Research Establishment, 40% of installation problems arise from improper measurements. Fix any last-minute discrepancies with shims or spacers. This attention to detail is vital in achieving a smooth, appealing finish.
Securing wall panels on irregular surfaces requires a strategic approach. An industry report indicates that approximately 40% of homes have uneven walls. This can stem from settling, poor original construction, or age. Understanding the nature of the surface is key. Using shims or furring strips can help create a level foundation. These adjustments not only stabilize the panels but also ensure a snug fit against the wall.
Another technique is the use of construction adhesive. Applying adhesive along with mechanical fasteners enhances the bond between the panel and the wall. Research shows that adhesive can increase panel holding strength by up to 30%. For areas with significant dips or protrusions, pre-cutting panels can ease installation. It's advisable to measure multiple points on the wall. This helps in identifying the most effective panel positioning.
While securing wall panels, mistakes can occur. Improper measurements might lead to gaps or uneven edges. It's crucial to take time with planning rather than rushing through the installation. Investing in high-quality tools can mitigate some challenges, but it's essential to remain adaptable. Remember that not every surface will yield to perfect installations. Embracing imperfections can offer a unique aesthetic appeal in home decor.
When installing wall panels on uneven surfaces, finishing touches are vital to achieve a polished look. One effective approach is to use trim or molding. A well-chosen trim can bridge gaps and highlight the panel's design. This not only conceals imperfections but also adds visual interest. Consider using crown molding or baseboards that complement your overall decor style.
Another technique is to employ paint or stain to enhance the panels. Selecting a color that contrasts with the panels can create depth. A fresh coat of paint can bring life to the installation. Make sure the finish is even and consistent. Inevitably, the application might need some touch-ups. Mistakes happen, so plan for corrections.
Lighting is also crucial for finishing touches. Proper lighting can dramatically enhance the appearance of your wall panels. Use warm white LED strips to create an inviting atmosphere. However, be aware that light can reveal flaws. Spend time adjusting the brightness and placement to showcase the panels effectively. A little extra effort on these finishing touches can greatly elevate your space, making it feel professionally designed.
: Uneven surfaces can cause gaps and warping, leading to installation issues.
Use a straightedge or level to check for bumps and dips.
Proper cleaning ensures good adhesion, which helps avoid future issues.
Measure them carefully and consider using shims for a better fit.
Trim conceals gaps and adds visual interest, improving the overall appearance.
Paint can create depth and refresh the design, but touch-ups may be necessary.
Proper lighting enhances the appearance but may also reveal flaws.
Overlooking minor imperfections can negatively impact panel alignment.
Be patient and ready to make corrections as needed throughout the process.
No, achieving a seamless finish may take several attempts and refinements.
Installing wall panels over uneven surfaces can present unique challenges, but with the right approach, it can be accomplished easily and effectively. To begin, it's important to understand the specific issues posed by an irregular wall, which may include variations in surface texture and alignment. Gathering the necessary tools and materials is the next step, ensuring a smoother installation process.
The process involves a detailed preparation of the walls, where you may need to level out certain areas or add supports to ensure a solid base. Various techniques are available for securing the wall panels, such as using shims or adhesive, depending on the extent of the unevenness. Finally, don’t overlook the finishing touches that can enhance the overall appearance of the installed panels. By following these steps, one can confidently tackle the question of how to install wall panels over uneven surfaces, achieving a professional and attractive result.